How to Edit A Zoom Recording of Your Meeting or Webinar
Learn how to use Wistia’s editing feature to trim your Zoom webinar recording and share it with your audience.
March 21, 2023
Topic tags
Zoom zoom! You’ve got a Zoom event that needs to be recorded and shared with your audience, and there’s a tight deadline to get that recording up and ready to watch.
If you have no time to fire up the ole video editing software or enlist the help of a video expert, don’t worry. You can do it all on your own with Wistia’s handy editing feature and Zoom integration. We’ll walk you through the process in this guide.
Here’s what we’ll cover:
Let’s zoom right into it!
How to record a Zoom meeting
The first step to getting a Zoom recording into Wistia is to, well, make sure that you record your Zoom event! All you need to do is press the “Record” button when you start the meeting or webinar.
Once the meeting wraps up, Zoom will work its magic and turn your event into a video file. Now, let’s dive into the exciting part: adding the recording to your Wistia content library so you can edit it!
Manually upload the recording from your computer
One way to get your recording from Zoom to Wistia is to manually do it in two steps:
- Download the Zoom recording to your computer.
- Upload the video file to Wistia.
This works just fine, but there’s an easier (and more automated) way.
Automatically import the recording from the Zoom cloud
The fastest way to get your Zoom recording into Wistia is by automatically importing it with our Zoom integration. Here are the steps:
- Open your Wistia Content Library.
- Hit the blue “New” button at the top right corner and then select “Import from Zoom” from the drop-down menu.
- Set up the integration to connect your Wistia account to Zoom.
- Select the Zoom cloud recording you wish to import.
It’s as simple as that! You can learn more about how to integrate Wistia and Zoom to set up this magical workflow.
How to edit a Zoom recording
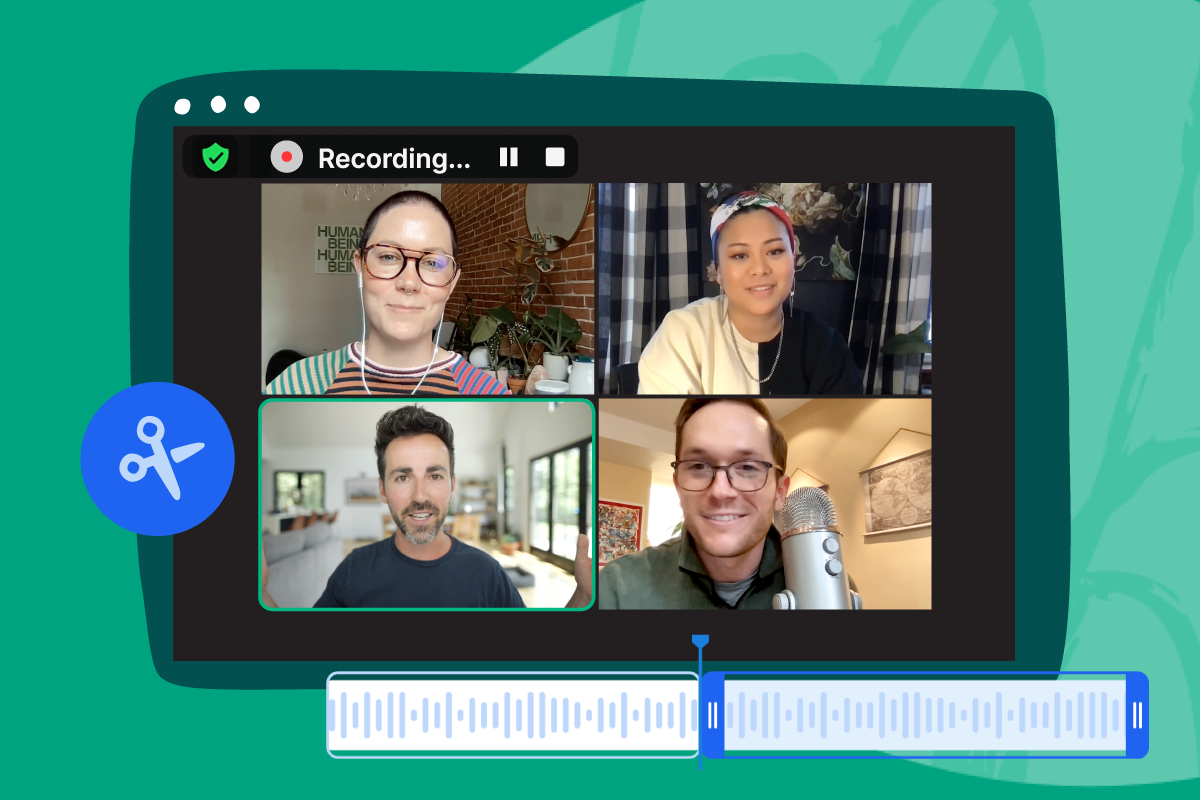
With your Zoom recording in Wistia, it’s time to trim it in our video editor.
Open the recording in the editor
There are two easy ways to do this:
Open it from the Content Library
- Find the recording in the Content Library.
- Select the media file.
- Press “Edit” on the left sidebar menu.
Open it from the editor
- From the Home screen, select “Edit” on the left sidebar menu.
- Find the recording to open in your timeline.
Now, let’s move on to how to edit videos online in Wistia.
Trim the recording
One of the first (and possibly only) edits you’ll want to make to a Zoom recording is trimming the start and end of the video. This is especially true if you’re editing a Zoom webinar recording or a Zoom meeting recording where you want to keep the presentation itself unedited, but you want to clean up the intros and outros a bit.
To trim a video in Wistia, you can simply:
- Click, drag, and move the start and end points.
- Move the playhead and use keyboard shortcuts to mark the in point (i) and out point (o).
With your recording trimmed, you can now consider some fancier editing techniques.
Split and delete clips
When editing a webinar recording, there might be times when you want to cut out a dramatically long pause or an awkward silence caused by a technical issue during your presentation. We’ve got you!
To trim down or delete a clip in the middle of your recording, simply move your playhead to the place in the timeline where you wish to make the edit and then:
- Select “Split” or use the “s” keyboard shortcut.
- Trim out the part you don’t want.
- Or split again later in the timeline and delete the split clip or use the “delete” key.
Stitch in multiple video clips
Did you know that you can jazz up your Zoom recording by adding clips from other media in your Wistia account right in the editor? Here are a couple of ideas:
Add a personalized video message
Whether you plan to share the edited video in a personal email or on your company blog, adding a quick message at the beginning can help hook viewers as soon as they hit play.
Add a bumper video
If you plan to share your edited webinar on your website or in a follow-up email, you might want to consider adding a video bumper.
What’s a bumper video? It’s a short clip that helps polish up the intro or outro of your video. This can be something as simple as a quick animation of your company logo with a sound effect or an animated title card with some intro music. Whatever it is, bumpers can give your videos a more professional watching experience.
To learn more about our editor, check out this video:
All-in-one Video Platform
Streamline Your Webinar Process
Get the most value from your Zoom recordings
We hope this guide helps you kick-start your Zoom webinar marketing strategy! With this new workflow, it’s easier than ever to streamline the process of editing Zoom recordings and sharing them online with Wistia.
Start importing your recordings into Wistia so you can edit, share, and measure the impact of your on-demand webinars all from one platform.
